
How Insulation Replacement Solves High Energy Bills and Comfort Issues in Sewall’s Point, FL?
Replacing degraded or insufficient insulation is one of the most effective ways to cut energy costs and restore indoor comfort…

If your energy bills keep climbing, your rooms feel unevenly heated, or your HVAC system seems to run nonstop, the culprit might be right above your head. Attic insulation is one of the most impactful upgrades you can make to your home, yet it remains one of the most overlooked. Most homeowners never think about what is above their ceiling until a problem becomes impossible to ignore.
Here is the reality: heat naturally moves from warm areas to cold ones. In winter, the warm air you are paying to generate rises straight through your ceiling and escapes through an under-insulated attic. In summer, the sun bakes your roof, and that heat radiates down into your living space, forcing your air conditioning to work overtime. Without proper insulation and air sealing in your attic, you are essentially paying to heat and cool the outdoors, which directly impacts overall attic insulation cost considerations in Jupiter, FL.
We have spent years working on attic insulation projects of every size and complexity, and we have seen firsthand how the right insulation transforms a home. This guide pulls together everything we have learned, from the basic science of heat flow to the specific materials, R-values, installation methods, and common pitfalls you need to understand before making a decision.
By the time you finish reading, you will know how to assess your current insulation, understand which type of material is right for your situation, what the installation process involves, and how to make sure the job gets done correctly. Whether you are planning a DIY project or looking to hire a professional, this guide covers it all.
Attic insulation is any material installed in your attic space that resists the transfer of heat between your living areas and the outside environment. It acts as a thermal barrier, slowing down the three ways heat moves: conduction (through solid materials), convection (through air movement), and radiation (heat traveling in straight lines from a warm surface).
The U.S. Department of Energy explains that properly insulating your home reduces heating and cooling costs while improving comfort. Insulation materials work primarily by slowing conductive and convective heat flow, though some products like radiant barriers specifically target radiant heat gain.
Why does the attic matter more than other parts of your home? Because it is the single largest source of energy loss in most houses. Heat rises, which means your attic floor is the last line of defense between your conditioned living space and the extreme temperatures inside an unconditioned attic. During summer, attic temperatures can exceed 150 degrees Fahrenheit. Without adequate insulation, that heat conducts downward through your ceiling drywall and warms every room below it.
The numbers tell the story clearly. According to research sponsored by the Insulation Institute, roughly 89 percent of single-family homes in the United States are under-insulated. That means nine out of ten homes are wasting energy, money, and comfort every single day. If your home was built before modern energy codes took effect, there is a strong chance yours is one of them.
Understanding the basics of heat transfer helps you make smarter decisions about insulation. There are three mechanisms at play:
Expert Tip: Before adding any insulation, always seal air leaks first. Gaps around plumbing pipes, electrical wires, recessed lights, and chimney chases allow conditioned air to escape. Even the best insulation cannot stop air from moving through an open gap.
R-value is the standard measurement of an insulation material’s resistance to heat flow. The higher the R-value, the more effective the insulation is at slowing heat transfer. When you see an insulation product labeled R-30 or R-49, that number tells you how much thermal resistance it provides.
Several factors affect R-value:
One common misunderstanding is that you can simply add R-values together across different types. In reality, the overall R-value of your ceiling assembly differs from the insulation’s rated R-value because heat flows more readily through wood framing (studs, joists, rafters) than through insulation. The U.S. Department of Energy calls this phenomenon “thermal bridging,” and it means your actual performance is slightly lower than the insulation label suggests.
Expert Tip: Never compress batt insulation to fit into a tighter space. A compressed R-30 batt might only deliver R-19 performance. The air pockets inside the insulation are what give it thermal resistance. Squeezing them out defeats the purpose.
The amount of insulation you need depends heavily on where you live. The DOE and ENERGY STAR divide the United States into climate zones, each with specific R-value recommendations for attics, walls, and floors. Here is a breakdown of attic insulation recommendations from ENERGY STAR:
| Climate Zone | Uninsulated Attic | Existing 3-4 Inches of Insulation |
|---|---|---|
| Zone 1 (Hawaii, Puerto Rico, Southern Florida) | R-30 | R-25 |
| Zone 2 (Most of Florida, Southern Texas, Gulf Coast) | R-49 | R-38 |
| Zone 3 (Southern states, lower mid-Atlantic) | R-49 | R-38 |
| Zone 4A and 4B (Mid-Atlantic, Midwest) | R-60 | R-49 |
| Zone 4C, 5, and 6 (Pacific Northwest, Northeast, Upper Midwest) | R-60 | R-49 |
| Zone 7 and 8 (Northern states, Alaska) | R-60 | R-49 |
If your home is in South Florida, which falls in Zone 2, the target is R-49 for an uninsulated attic. If you already have a few inches of insulation up there, you should add enough to reach R-38 on top of what exists. For homes in colder climates, the target climbs to R-60.
To check what you currently have, take a ruler or tape measure into your attic and measure the depth of the existing insulation. Multiply the depth in inches by the R-value per inch of the material. For example, 10 inches of blown-in fiberglass at roughly R-2.5 per inch gives you about R-25. If your target is R-49, you know you need to add significant material.
Key Takeaways:
Not all insulation is created equal. Each material has different performance characteristics, installation requirements, costs, and ideal use cases. Here is an in-depth look at the main options.
Fiberglass is the most widely recognized insulation material in the United States. It is made from spun glass fibers and comes in pre-cut batts or long rolls designed to fit between standard framing. Fiberglass batts typically offer R-2.9 to R-3.8 per inch of thickness.
Pros:
Cons:
Fiberglass batts work best for attics with regular joist spacing and relatively few obstructions. If your attic has a lot of cross-bracing, ductwork, or irregular framing, loose-fill or spray foam may be a better fit.
Loose-fill insulation is exactly what it sounds like: small particles of fiberglass, cellulose, or mineral wool that are blown into the attic using a specialized machine. The material settles around obstacles and conforms to the space, providing more even coverage than batts in irregular attics.
Fiberglass loose-fill delivers roughly R-2.5 per inch. Cellulose loose-fill, made from recycled paper treated with fire retardants, provides approximately R-3.5 per inch, giving it a meaningful advantage in thermal performance per inch.
Pros:
Cons:
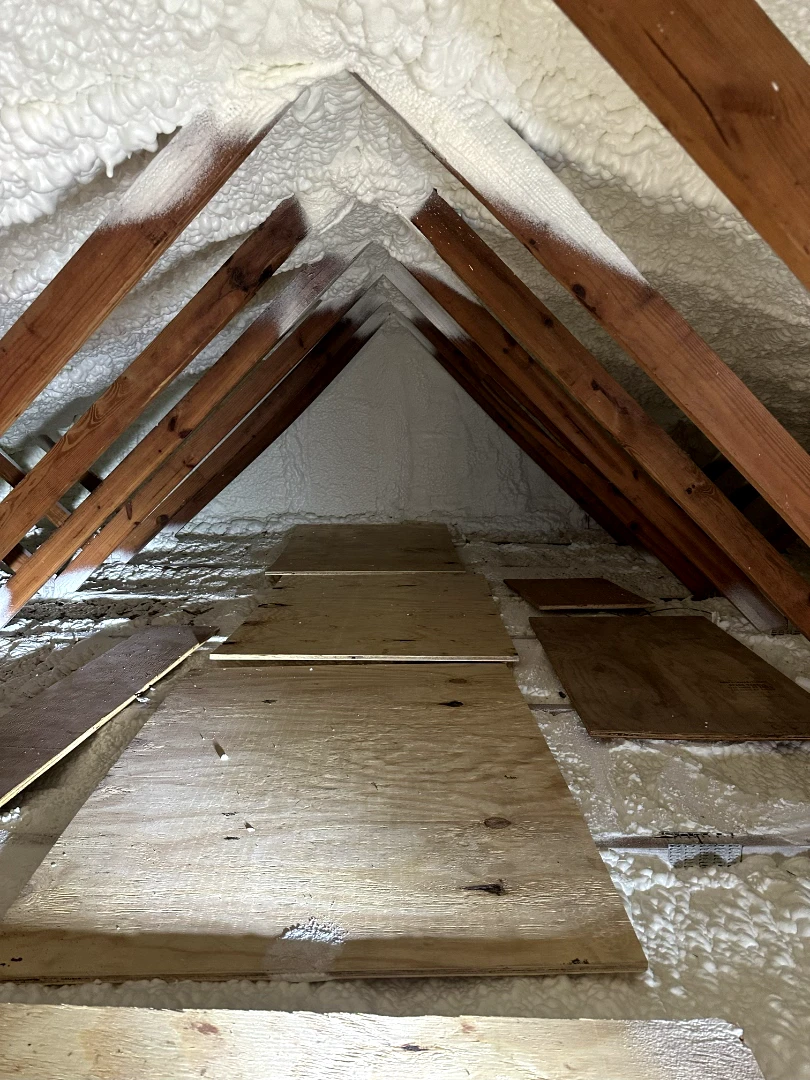
Spray foam is a two-component product that expands upon application, filling cavities, cracks, and gaps. It comes in two main types:
Pros:
Cons:
Expert Tip: If you are choosing between open-cell and closed-cell spray foam for an attic application, closed-cell is generally preferred for roof decks and areas where moisture resistance matters. Open-cell works well for attic floors where the primary goal is filling cavities between joists.
Cellulose is made primarily from recycled newsprint treated with borate compounds for fire and pest resistance. It is one of the most environmentally friendly insulation options available, with recycled content typically exceeding 80 percent.
Cellulose is usually installed as loose-fill in attics, though dense-pack cellulose can be used in wall cavities. Its R-3.5 per inch rating makes it more effective per inch than fiberglass batts.
Pros:
Cons:
Rigid foam boards come in several varieties, including expanded polystyrene (EPS), extruded polystyrene (XPS), and polyisocyanurate. They are typically used in walls, basement rim joists, and as continuous insulation on exterior walls, but they can also serve a purpose in certain attic applications.
R-values range from R-3.8 (EPS) to R-6.5 (polyiso) per inch. Foam boards provide consistent, predictable R-value without the settling or compression issues of other materials.
Radiant barriers are not insulation in the traditional sense. They consist of a highly reflective material (usually aluminum foil) applied to a substrate like kraft paper or plastic film. Instead of resisting conductive heat flow, they reflect radiant heat away from the living space.
These are particularly effective in hot, sunny climates where the primary concern is keeping attic heat from radiating into the home. They have no inherent R-value, so they are typically used alongside conventional insulation rather than as a replacement.
| Material | R-Value per Inch | Best For | Lifespan | DIY-Friendly |
|---|---|---|---|---|
| Fiberglass Batts | 2.9 – 3.8 | Regular framing, simple layouts | 80-100 years | Yes |
| Blown-In Fiberglass | 2.5 | Irregular attics, adding over existing | 80-100 years | With rental equipment |
| Blown-In Cellulose | 3.5 | Eco-conscious homeowners, irregular attics | 20-30 years | With rental equipment |
| Open-Cell Spray Foam | 3.7 | Filling cavities, air sealing | Lifetime | No |
| Closed-Cell Spray Foam | 6.5 | Maximum R-value per inch, moisture resistance | Lifetime | No |
| Rigid Foam Board | 3.8 – 6.5 | Continuous insulation, specialty applications | 50-100 years | Moderate |
| Radiant Barrier | N/A | Hot climates, reducing radiant heat gain | 10-20 years | Yes |
Most homes need an insulation upgrade. But how do you know for sure? Here are the most common indicators:
Expert Tip: If your home was built before 1990, there is a very high probability that it does not meet current insulation standards. Building codes have tightened significantly over the decades, and what was considered adequate in the 1970s falls well short of modern recommendations.

A proper attic insulation project involves more than just dumping material between the joists. Here is the step-by-step process that ensures the job is done right.
Before anything else, the attic needs a thorough inspection. This includes identifying the type and condition of existing insulation, checking for moisture damage or leaks, assessing ventilation, locating knob-and-tube wiring (common in pre-1930 homes, which presents a fire hazard near insulation), and documenting any pest activity.
This is also when you measure existing insulation depth and calculate your current R-value. Compare it to the recommended R-value for your climate zone to determine how much material you need to add.
Air sealing always comes before insulation. As ENERGY STAR recommends, you should seal all air leaks in the attic before adding any insulation material. Common leak locations include:
Use caulk for small gaps and expanding spray foam for larger openings. For areas around chimneys and flues, use sheet metal and high-temperature caulk rated for fire safety.
Expert Tip: Air sealing alone can make a noticeable difference in comfort and energy bills. If you only have the budget for one project right now, sealing attic air leaks gives you the fastest return on investment.
Attic ventilation works hand in hand with insulation. You need airflow from soffit vents at the eaves up through ridge vents or gable vents near the top of the roof. This airflow removes moisture and prevents heat buildup.
Install insulation baffles (also called rafter vents) at the eaves to keep insulation from blocking soffit vents. Without baffles, blown-in or loose-fill insulation can easily drift over and choke off the air intake, leading to moisture problems and reduced insulation effectiveness.
With air sealing and ventilation addressed, it is time to install the insulation:
After installation, several items need verification:
Key Takeaways:
In our experience, these are the errors we see most often, both from DIY attempts and from inexperienced installers:
Based on our project data at ALL IN OVERHALL, attic insulation projects typically range from $1,500 on the low end to $15,000 on the high end, with an average project cost of around $5,000. The final price depends on several factors:
For closed-cell spray foam applications, which deliver the highest R-value per inch and include air sealing, typical project costs range from $2,000 to $25,000 depending on scope. Open-cell spray foam projects range from $1,500 to $15,000.
The return on investment is where attic insulation really shines. ENERGY STAR estimates that homeowners can save an average of 15 percent on heating and cooling costs by air sealing and adding insulation. In northern climate zones, that number can reach 20 percent. For many homes, the insulation project pays for itself within a few years through energy savings alone.
There are also federal tax credits available. The 25C Energy Efficient Home Improvement Tax Credit, boosted through the Inflation Reduction Act, provides up to $1,200 per year for qualifying insulation and air sealing improvements through 2032. This effectively reduces your out-of-pocket cost.
Lifespan varies significantly by material:
| Material | Typical Lifespan | Notes |
|---|---|---|
| Fiberglass (batts or blown-in) | 80-100 years | Can degrade if exposed to moisture or compressed |
| Cellulose (blown-in) | 20-30 years | Settles over time, reducing R-value; may need topping up |
| Spray Foam (open and closed cell) | Lifetime | Most durable option when properly installed |
| Rigid Foam Board | 50-100 years | Stable R-value, but exposed edges can be damaged |
The actual lifespan depends heavily on environmental conditions. Moisture from roof leaks, condensation, or inadequate ventilation can degrade any material. Pest infestations can damage fiberglass and cellulose. Regular inspections, ideally once a year, help you catch problems before they compromise the insulation’s performance.
If your insulation has been damaged by water, mold, or pests, it needs to be removed and replaced rather than simply covered over. Trapping compromised material under new insulation creates ongoing moisture and air quality problems.
You now have a thorough understanding of how attic insulation works, what materials are available, how to determine the right R-value for your climate, what the installation process involves, and what mistakes to avoid. The next step is applying this knowledge to your specific situation.
Start by assessing your current attic. Measure the insulation depth, check for signs of damage or moisture, and identify air leaks. Compare your existing R-value to the recommendation for your climate zone. If there is a gap, you have a clear opportunity to improve your home’s comfort and efficiency.
Remember the fundamentals: air seal first, ventilate properly, choose the right material for your situation, and install enough insulation to meet or exceed the recommended R-value. Whether you tackle the project yourself or work with a professional, these principles remain the same.
Attic insulation is not the most glamorous home improvement project, but it is one of the most practical and financially rewarding upgrades you can make. Every month you wait is another month of higher energy bills and reduced comfort. Take what you have learned here and put it to work.
If you are ready to upgrade your attic insulation or want a professional assessment of your current situation, we are here to help. Our team at ALL IN OVERHALL specializes in spray foam insulation, blown-in insulation, and complete insulation removal and replacement for homes throughout South Florida. We bring the experience and attention to detail that ensures the job is done right the first time. Reach out to us at [email protected] or call (561) 406-3835 to schedule a consultation and get a clear picture of what your attic needs.
Go into your attic with a ruler and measure the depth of the insulation. If you can see the tops of the ceiling joists, you need more. Compare your measured R-value against the recommended levels for your climate zone. For most of Florida (Zone 2), the target is R-49 for an uninsulated attic.
Yes, in most cases, you can layer new insulation over existing material. You do not need to use the same type. Blown-in insulation can go over fiberglass batts, and vice versa. If you use batts as a second layer, lay them perpendicular to the first and make sure they are unfaced (no paper or foil backing). However, if the existing insulation is wet, moldy, or pest-damaged, it should be removed before adding new material.
It depends on your priorities. Spray foam delivers the highest R-value per inch and provides air sealing in a single application. For attics with complex framing, numerous air leaks, or limited space for thick insulation layers, spray foam often delivers superior performance that justifies the investment. For straightforward attic floors with plenty of room for deep insulation, fiberglass or cellulose can achieve the same R-value at a lower cost.
This depends on whether you want a vented or unvented attic. Insulating the attic floor is the traditional approach and keeps the attic space unconditioned. Insulating the roof deck with spray foam creates a conditioned attic, which can be beneficial if you have HVAC equipment in the attic or want to use the space for storage. Each approach has different moisture management requirements.
Absolutely. In hot climates, the primary function of attic insulation is to resist heat gain from the sun baking your roof. Without adequate insulation, that heat radiates through your ceiling and forces your air conditioner to work harder. Proper attic insulation and air sealing are among the most effective ways to reduce cooling costs in warm climates.
Most residential attic insulation projects are completed in one to two days. Air sealing may add a half day. Insulation removal, if needed, adds another day. Complex projects involving spray foam on the roof deck or extensive preparation work may take three to four days.

