Your guide to why open-cell spray foam insulation adheres to most surfaces
admin-allinoverhall
January 19th, 2026
Have you ever watched spray foam insulation transform from a liquid into a solid, expanding mass that seemingly sticks to everything it touches? It’s almost magical how this material can fill every nook and cranny while creating a permanent bond with wood, concrete, metal, and even plastic. But this isn’t magic, it’s science at work, and understanding it can make the difference between a perfectly insulated space and a costly failure.
Whether you’re a homeowner planning an insulation project, a contractor looking to expand your services, or just curious about building science, this guide will walk you through everything you need to know about why open-cell spray foam has such remarkable adhesive properties. You’ll learn about the chemical reactions that make adhesion possible, the surface preparation techniques that ensure success, and the common pitfalls that can lead to problems down the road.
After years of hands-on experience with spray foam applications across countless projects, the insights in this guide come from real-world knowledge rather than textbook theory. By the end, you’ll understand not just how spray foam sticks to surfaces, but how to ensure it sticks properly every single time.
Understanding Open-Cell Spray Foam Insulation
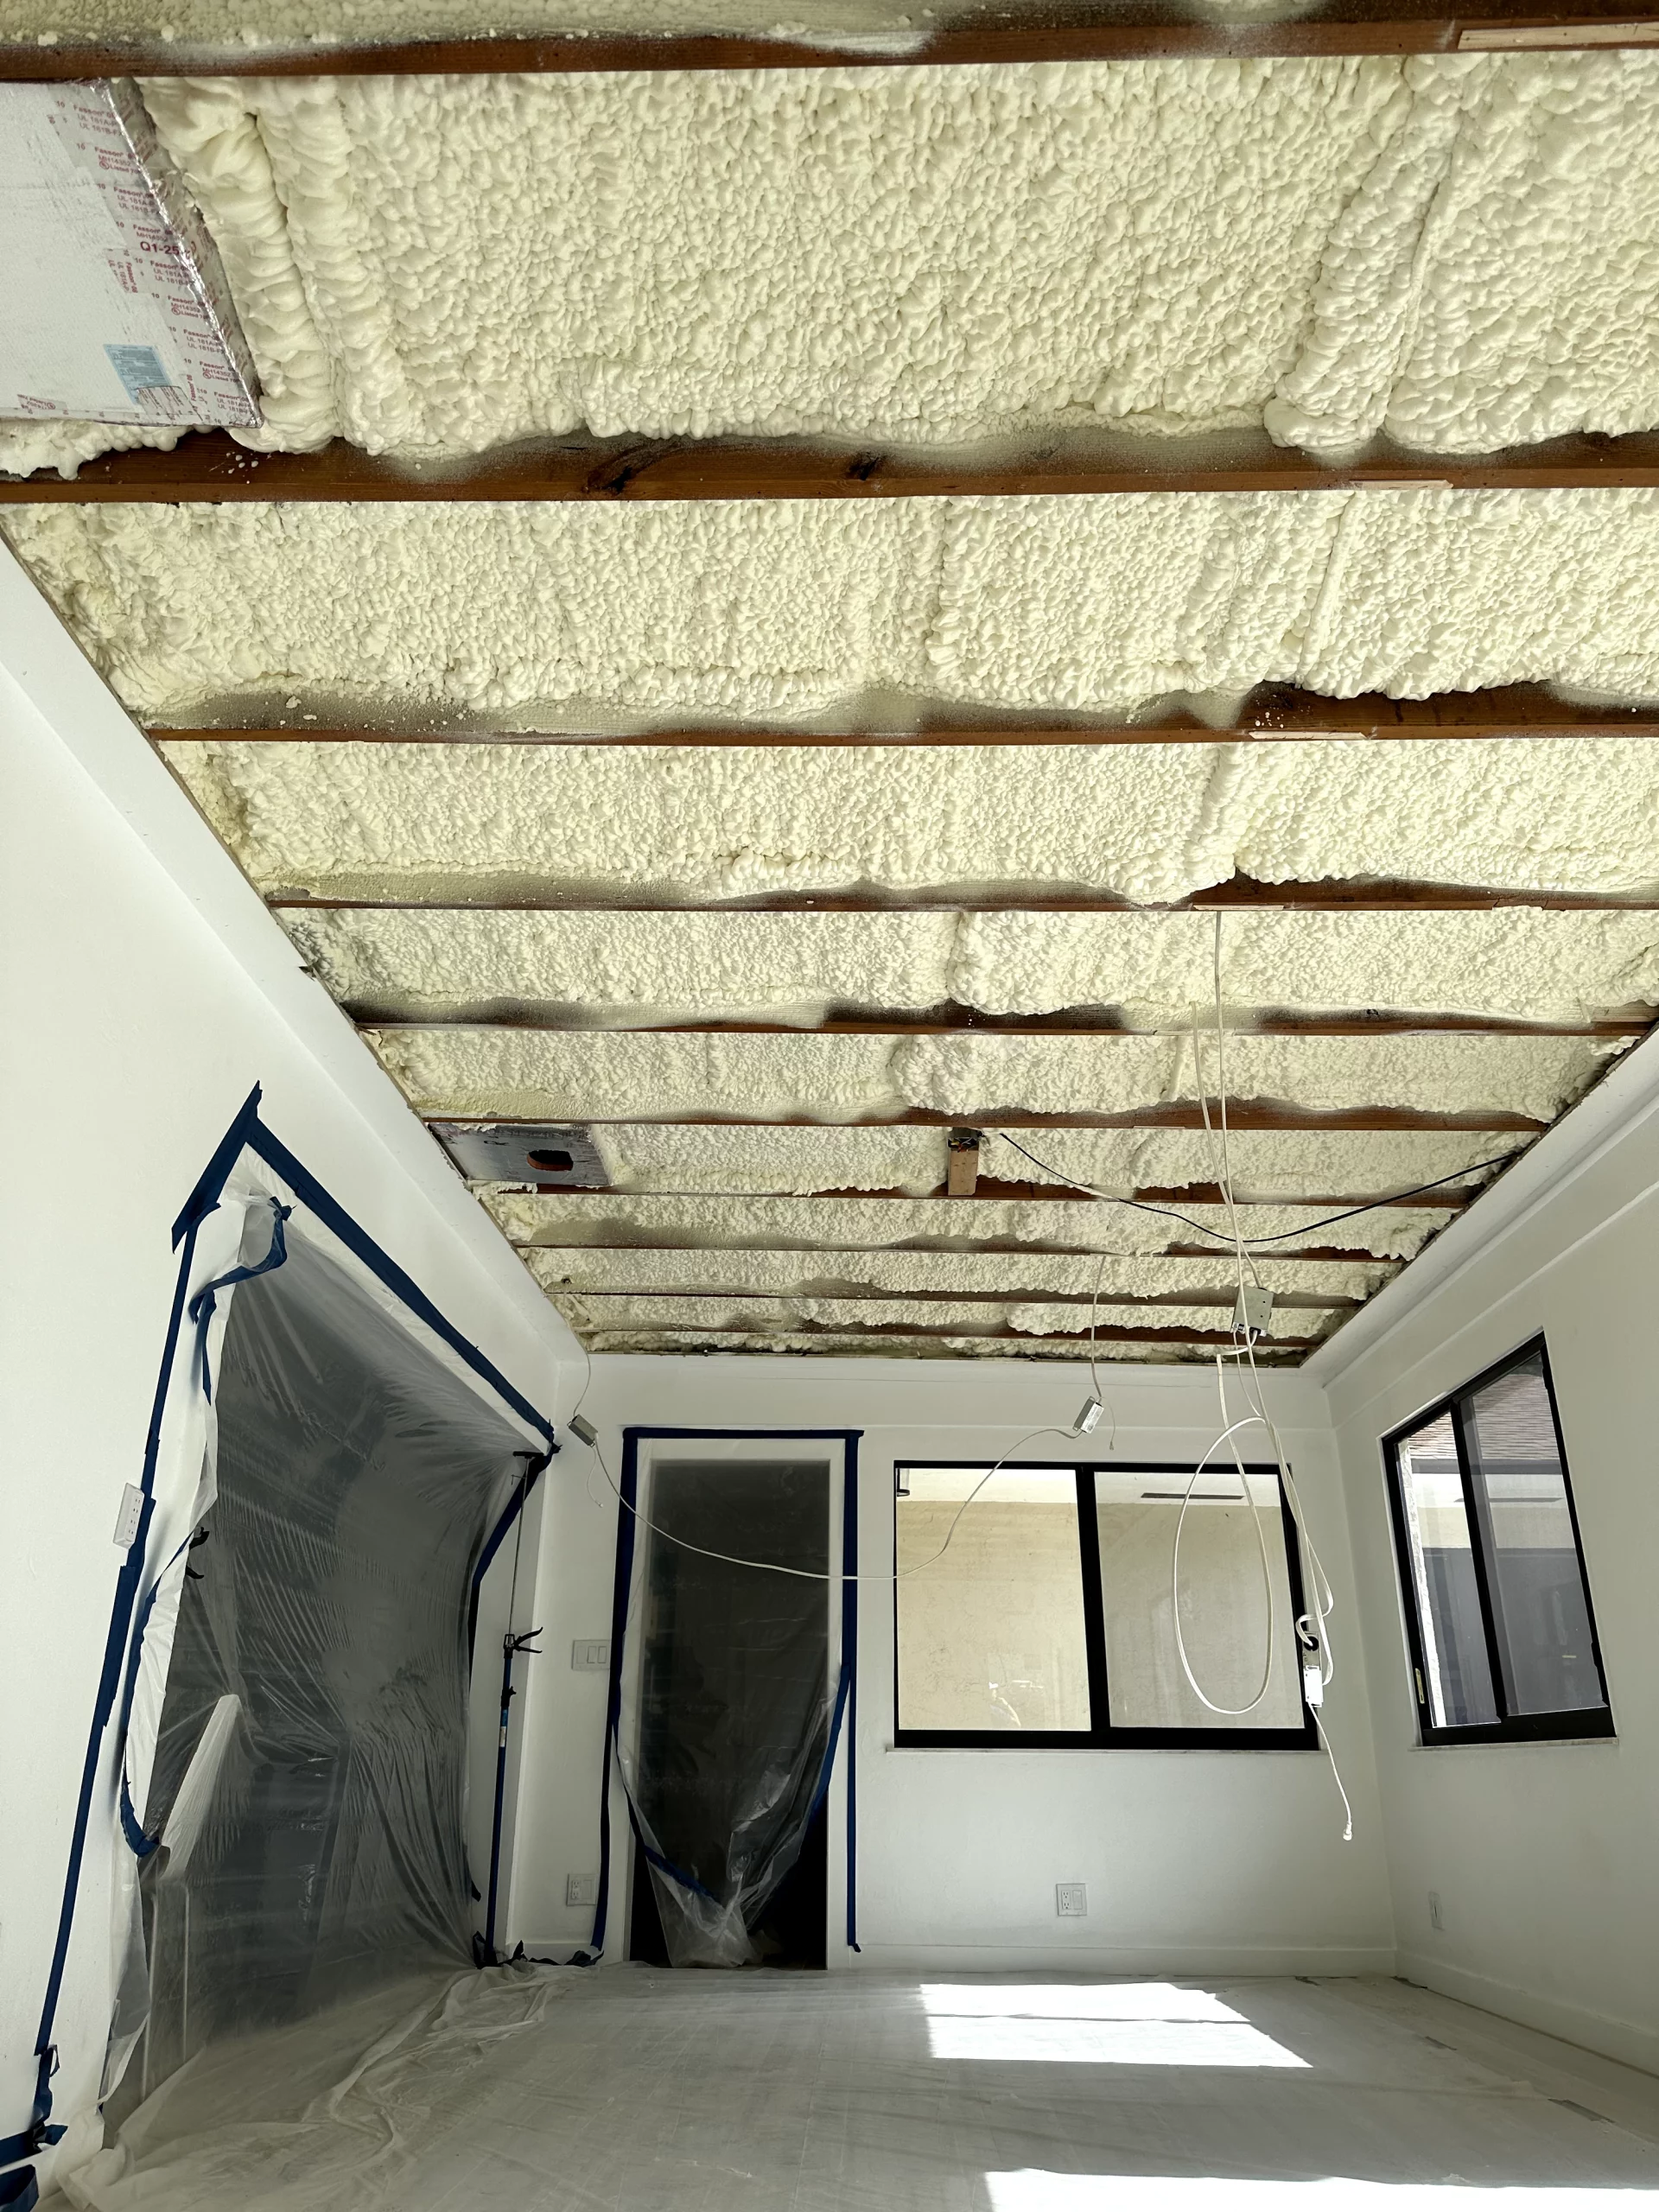
Before diving into adhesion, it’s essential to understand what open-cell spray foam actually is. Unlike its closed-cell counterpart, open-cell spray foam is a flexible, breathable material with a cellular structure that’s intentionally left partially open. Think of it like a microscopic sponge, each cell is interconnected with others, allowing air and moisture to pass through while still blocking heat transfer.
The magic starts with two chemical components that arrive in separate containers: the A-side (isocyanate) and the B-side (polyol resin blend). When these components mix at the spray tip, they react almost instantly, expanding up to 100-150 times their original volume and curing into a solid foam within seconds. This rapid expansion is key to its adhesive properties. The foam literally grows into every microscopic imperfection on a surface, creating a mechanical lock that’s difficult to break.
Expert Tip: The temperature of both the chemicals and the substrate surface affects the reaction. In colder conditions, the foam may not expand as fully or adhere as strongly. Always check manufacturer guidelines for minimum application temperatures.
According to the U.S. Department of Energy, spray foam insulation can reduce energy costs by up to 50% when properly installed, largely due to its ability to create an airtight seal that traditional insulation materials can’t match. This airtight seal is only possible because of the foam’s superior adhesion properties.
The Science Behind Adhesion: How Open-Cell Foam Bonds to Surfaces
The adhesive properties of open-cell spray foam stem from three primary mechanisms working together: chemical bonding, mechanical interlocking, and physical adsorption. Understanding these mechanisms helps explain why this material can stick to such a wide variety of surfaces.
Chemical bonding occurs when the reactive isocyanates in the foam chemically react with hydroxyl groups present in many common building materials, particularly wood and concrete. This creates covalent bonds—essentially welding the foam to the surface at a molecular level. While not all surfaces have reactive groups for chemical bonding, the other mechanisms compensate.
Mechanical interlocking might be the most important factor. As the foam expands, it flows into every microscopic crack, pore, and imperfection in the substrate surface. When it cures, it’s essentially locked in place like a puzzle piece. This is why even non-porous surfaces like metal can still achieve good adhesion with proper preparation—surface roughness creates plenty of mechanical anchor points.
Physical adsorption refers to the weak intermolecular forces (van der Waals forces) that develop when two materials come into close contact. While these forces are individually weak, they become significant across the entire contact area between foam and substrate.
Table: Adhesion Mechanisms for Different Surface Types
Surface Type
Primary Adhesion Mechanism
Secondary Mechanisms
Typical Bond Strength
Wood
Chemical bonding + Mechanical
Physical adsorption
Excellent
Concrete
Chemical bonding + Mechanical
Physical adsorption
Excellent
Metal
Mechanical interlocking
Physical adsorption
Good to Very Good
Plastic
Mechanical interlocking
Physical adsorption
Fair to Good
Glass
Mechanical interlocking
Physical adsorption
Poor to Fair
The expansion process itself contributes to adhesion. As the foam expands, it creates pressure against the substrate surface, forcing it into intimate contact and driving out any air or contaminants that might interfere with bonding. This pressure is maintained until the foam cures, ensuring maximum contact area.
Key Takeaways: Open-cell spray foam adheres through multiple mechanisms simultaneously. Chemical bonding works best with porous materials like wood and concrete, while mechanical interlocking provides reliable adhesion even on non-reactive surfaces when properly prepared.
Your guide to why open-cell spray foam insulation adheres to most surfaces 2
Surface Preparation: The Foundation of Successful Adhesion
No matter how good the foam is, proper surface preparation is non-negotiable for achieving maximum adhesion. Think of it like painting—the quality of your preparation directly determines the quality and longevity of the final result. Skimp here, and you’re asking for problems down the road.
Cleanliness is paramount. Any surface contamination—dust, oil, grease, loose particles, or moisture—will interfere with the foam’s ability to make direct contact with the substrate. For most applications, a thorough cleaning with a stiff brush followed by vacuuming is the minimum requirement. For oily or greasy surfaces, a degreasing cleaner may be necessary, followed by thorough drying.
Moisture management is another critical factor. While open-cell foam can accommodate some moisture during application, excessive water on the surface will prevent proper adhesion and may even cause the foam to fail or develop weak spots. The ideal moisture content varies by material, but as a general rule, wood should have a moisture content below 19%, and concrete should be visibly dry to the touch.
Surface profiling creates the texture needed for mechanical interlocking. For smooth surfaces like metal or plastic, light abrasion with sandpaper or a wire brush creates microscopic valleys and peaks that the expanding foam can grip. For very porous materials like unpainted wood, you might actually need to apply a primer to prevent excessive absorption, which could cause the foam to cure too quickly and lose adhesive strength.
Expert Tip: When working with previously painted surfaces, test the paint adhesion first. Apply a piece of duct tape firmly to the paint, then rip it off quickly. If paint comes with the tape, the surface needs to be scraped and possibly repainted before applying spray foam. Otherwise, the foam may bond to the paint rather than the substrate, creating a weak point in your insulation system.
Temperature also plays a crucial role in surface preparation. Most manufacturers recommend substrate temperatures between 60-80°F for optimal adhesion. In colder conditions, the foam’s reaction slows down, potentially reducing expansion and adhesive strength. In very hot conditions, the foam may cure too quickly before fully expanding into surface irregularities.
Table: Surface Preparation Checklist by Material Type
Material
Cleaning Method
Moisture Check
Surface Profiling Needed
Special Considerations
Unfinished Wood
Brush/vacuum
Moisture meter <19%
Usually not needed
May need primer for very porous wood
Painted Wood
Brush/vacuum
Visual inspection
Usually not needed
Test paint adhesion with the tape test
Concrete
Wire brush/vacuum
Visual dryness check
Usually not needed
Allow the new concrete to cure fully
Metal
Degreaser + wipe
Visual dryness check
Light abrasion recommended
Remove rust and scale first
Plastic
Cleaner + wipe
Visual dryness check
Light abrasion required
Test compatibility first
Proper surface preparation isn’t the most exciting part of a spray foam project, but it’s absolutely the most important for ensuring long-term performance. The extra time spent here pays dividends in years of trouble-free insulation performance.
Application Techniques for Maximum Adhesion
Even with perfect surface preparation, application technique can make or break the final result. The way spray foam is applied directly affects how well it adheres and performs over time. This is where experience really shows—the difference between a professional job and an amateur one often comes down to technical details.
Spray pattern and overlap are fundamental. The goal is to apply the foam in consistent, overlapping passes that ensure complete coverage without creating excessive thickness in any single pass. Most professionals use a slightly waving motion, overlapping each pass by about 50%. This creates a uniform layer without cold spots where the foam might be thinner and potentially have weaker adhesion.
Layer thickness matters more than many people realize. While it might seem efficient to apply thick layers, open-cell spray foam typically performs best when applied in passes of 2-3 inches maximum. Thicker applications can trap heat from the exothermic reaction, potentially damaging the foam or even creating a fire hazard in extreme cases. Multiple thinner layers actually achieve better overall adhesion because each layer has time to partially cure before the next one is applied, creating a more stable bond.
Spray distance and angle affect the foam’s cell structure and adhesion. The optimal distance from the spray gun to the substrate is typically 18-24 inches, though this varies by manufacturer and equipment. Too close, and you’ll get a dense, possibly over-expanded layer with poor cell structure. Too far, and the foam may begin curing before it reaches the surface, reducing adhesion. Aim for a 45-degree angle rather than spraying straight on—this helps the foam spread slightly as it contacts the surface, improving coverage.
Environmental conditions during application are often overlooked but crucial. High humidity can affect the foam’s cell structure and adhesion properties. Most manufacturers recommend humidity levels between 20-80% for optimal results. Extremely high humidity can cause the foam to become brittle, while very low humidity can accelerate curing too much, reducing expansion into surface irregularities.
Expert Tip: Always do a test spray on a scrap piece of the same material you’ll be insulating. This lets you verify the foam’s expansion ratio, adhesion, and cure time under current conditions before committing to the main application. Adjust your technique based on these test results.
Curing time is another consideration. While open-cell spray foam becomes tack-free within seconds, it continues to cure and off-gas for 24-72 hours. During this period, avoid any mechanical stress or disturbance that could compromise the adhesive bond. The foam reaches its full adhesive strength after approximately 24 hours, though this varies with temperature and humidity.
The building science experts at Building Science Corporation emphasize that proper application technique is just as important as material quality for achieving long-term performance. Their research shows that even with premium materials, poor application can lead to insulation failures within just a few years.
Comparing Adhesion: Open-Cell vs. Other Insulation Types
Understanding how open-cell spray foam’s adhesion compares to other insulation options helps explain its unique value proposition. While traditional insulation materials have their place, none offer the same combination of adhesive properties and sealing capabilities.
Fiberglass insulation essentially has zero adhesive properties. It relies on friction and compression between the insulation and framing members to stay in place. This means there are always gaps around studs, plates, and other obstructions where air can move freely. According to the Insulation Institute, even properly installed fiberglass can leave up to 30% of wall area unsealed due to these gaps.
Cellulose insulation performs slightly better than fiberglass because it’s denser and can pack into cavities more completely. However, it still lacks any true adhesive qualities and relies entirely on friction to stay in place. Over time, cellulose can settle, creating gaps at the top of walls that compromise insulation performance.
Rigid foam board offers better performance than batt insulation because it can be sealed at seams with tape or spray foam. However, the boards themselves only adhere at fastener points, leaving large areas where air movement can occur behind or around the boards. The board-to-board connections are often the weak points in these systems.
Closed-cell spray foam does have adhesive properties similar to open-cell foam, though the chemistry is different. Closed-cell foam typically achieves slightly stronger initial bonds due to its higher density and different chemical formulation. However, this comes at a significantly higher cost and with less flexibility, which can be problematic in building assemblies that experience movement.
The true advantage of open-cell spray foam’s adhesion becomes clear when you consider air sealing. Because it bonds to every surface it touches, it creates a continuous air barrier that eliminates the convective loops that reduce the effectiveness of other insulation types. The Spray Polyurethane Foam Alliance reports that homes insulated with spray foam typically show 40-50% less air leakage than those with traditional insulation.
Key Takeaways: Open-cell spray foam’s adhesive properties create benefits that go beyond just staying in place. The continuous bond eliminates air movement through the insulation assembly, dramatically improving overall energy efficiency and comfort compared to non-adhesive insulation options.
Common Adhesion Problems and Solutions
Even with proper preparation and application, things can sometimes go wrong. Understanding common adhesion problems and their solutions can help you troubleshoot issues before they become major failures.
Delamination is perhaps the most serious adhesion problem. This occurs when the foam pulls away from the substrate, creating gaps that compromise insulation performance. Delamination typically results from one of three issues: surface contamination, moisture problems, or incompatible substrate materials. If you notice the foam pulling away from surfaces, check for any of these conditions. The solution usually involves removing the affected foam, properly preparing the surface, and reapplying.
Bubbling or blistering indicates trapped gases or moisture between the foam and substrate. This often occurs when the surface temperature is significantly different from the ambient temperature, leading to condensation. The solution is to allow the substrate to reach equilibrium temperature with the surrounding air before application. In some cases, applying a thin primer can help moderate temperature differences.
Weak spots or soft areas in the cured foam usually indicate poor mixing of the chemical components or improper application temperature. These areas won’t have the proper cell structure or adhesive strength. Unfortunately, there’s no way to fix weak spots after curing—they must be removed and replaced. Prevention is key here: ensure your equipment is properly calibrated and maintain appropriate application temperatures.
Expert Tip: Always keep a small amount of manufacturer-approved cleaner and disposal materials on hand. If you notice problems during application, you can clean the surface immediately and restart while conditions are still favorable. Once the foam cures, corrections become much more difficult and costly.
Cracking can occur when the foam cures too quickly, often due to high substrate temperatures or direct sunlight. The rapid surface curing creates tension as the underlying foam continues to expand. To prevent this, avoid applying foam in direct sunlight or on surfaces that have been heated by the sun. In warm climates, early morning or late afternoon applications typically yield better results.
Inconsistent expansion leads to uneven surfaces and potential gaps in coverage. This usually results from equipment issues or improper chemical temperatures. The solution is to verify that your spray rig is properly maintained and that chemical temperatures are within manufacturer specifications. Many professionals use heated hoses to maintain a consistent chemical temperature from the tank to the spray gun.
The cost to fix adhesion problems after the fact can be high. Industry data suggests that remediation costs for failed insulation jobs can run 3-5 times the original installation cost, excluding any damage to building materials that may have occurred. Investing time in proper preparation and application techniques upfront always pays off in the long run.
Environmental and Safety Considerations
The same chemical properties that make open-cell spray foam such an effective adhesive also require careful handling and consideration of health and environmental impacts. Understanding these considerations helps ensure safe, responsible installation.
Volatile Organic Compounds (VOCs) are released during the application and curing process. While modern formulations have significantly reduced VOC levels compared to early spray foam products, some off-gassing still occurs. The Environmental Protection Agency recommends using ventilation equipment during application and avoiding the area for at least 24 hours after installation to allow for proper curing and off-gassing.
Personal Protective Equipment (PPE) is non-negotiable for anyone working with spray foam. At minimum, this includes:
Respiratory protection with appropriate organic vapor cartridges
Chemical-resistant gloves
Eye protection or a full-face shield
Protective clothing that covers all exposed skin
Proper ventilation systems for the work area
Fire ratings are an important consideration for open-cell spray foam. Most products require a thermal barrier (typically ½-inch drywall) between the foam and living spaces to meet building code requirements. The foam itself is combustible and will contribute to fire growth if left exposed. Always verify local code requirements and manufacturer recommendations for fire protection.
Environmental impact has improved significantly in recent years. Many manufacturers now offer formulations with lower global warming potential (GWP) blowing agents. Some products even incorporate bio-based polyols derived from renewable resources like soybeans. While spray foam has a higher embodied carbon footprint than some insulation options during manufacturing, its superior energy-saving performance over the building’s lifetime often provides a net environmental benefit.
Expert Tip: Always request the Material Safety Data Sheet (MSDS) for any spray foam product you’re using. This document contains detailed information about potential hazards, recommended protective equipment, and emergency procedures. Keep these documents accessible on the job site.
Disposal considerations are also important. Cured spray foam can typically be disposed of in regular construction waste, but unused chemicals and containers require special handling. Never pour excess chemicals down drains or onto the ground, as they can cause environmental damage and violate regulations.
Putting Your Spray Foam Adhesion Strategy into Action
Now you understand the science behind open-cell spray foam adhesion, the importance of surface preparation, proper application techniques, and potential pitfalls to avoid. The key takeaway is that successful spray foam installation isn’t about any single factor—it’s about the combination of material selection, surface preparation, application technique, and environmental conditions working together.
When planning your next project, remember that the adhesive properties of spray foam are what make it such an effective air barrier and insulation system. This isn’t just material staying in place, it’s creating a continuous seal that dramatically improves building performance. The time you invest in proper preparation and technique will pay dividends in energy savings, comfort, and durability for years to come.
Use this guide as a reference as you plan and execute your spray foam projects. Each building presents unique challenges, but the principles of good adhesion remain the same. Focus on creating the ideal conditions for the foam to do what it does best expand, cure, and bond to create a seamless insulation system.
Need Expert Guidance?
While this guide provides comprehensive information about spray foam adhesion, every project has unique considerations that benefit from professional experience. All in OverHall specializes in spray foam insulation installations and can help ensure your project achieves optimal performance through proper surface preparation and application techniques.
For professional consultation or installation services, reach out to the experts at All in OverHall. Contact [email protected] or call (561) 406-3835 to discuss your specific insulation needs and get personalized recommendations based on your project requirements.
Frequently Asked Questions
Can open-cell spray foam be applied to any surface?
Not quite. While open-cell spray foam adheres to most common building materials, there are some limitations. It shouldn’t be applied to surfaces that might release oils or chemicals over time, like some plastics or treated woods, without proper priming. Always check manufacturer compatibility guidelines for unusual substrates.
How long does the adhesive bond last?
When properly installed on a prepared surface, the adhesive bond is essentially permanent for the life of the building. The foam doesn’t degrade or lose adhesive strength over time under normal conditions. However, prolonged exposure to extreme moisture or structural movement can compromise the bond over many years.
Does temperature affect adhesion during application?
Absolutely. Both substrate and ambient temperature significantly affect adhesion. Most manufacturers recommend application temperatures between 60 and 80°F. In colder conditions, the foam may not expand fully or adhere as strongly. In very hot conditions, it might cure too quickly before achieving proper mechanical interlock.
Can I apply spray foam over existing insulation?
It’s generally not recommended to apply spray foam over existing fiberglass or cellulose insulation. The underlying insulation can trap moisture and prevent proper adhesion. It’s better to remove the old insulation, prepare the surfaces properly, and then apply the spray foam for maximum performance.
What happens if spray foam doesn’t adhere properly?
Poor adhesion leads to gaps in the insulation system, air leakage, reduced energy efficiency, and potential moisture problems. In severe cases, sections of foam may eventually fall away from the substrate. This is why proper surface preparation and application technique are so critical.
Is primer ever necessary for good adhesion?
Sometimes. For very porous surfaces that might absorb the foam too quickly, or for very smooth non-porous surfaces, a compatible primer can improve adhesion. Always follow manufacturer recommendations regarding priming. Using the wrong primer can actually reduce adhesion rather than improve it.
Sources
U.S. Department of Energy – Federal agency providing energy efficiency information and recommendations for spray foam insulation benefits
Building Science Corporation – Building science research organization providing technical information on proper spray foam application techniques
Spray Polyurethane Foam Alliance – Industry trade association offering technical data and performance statistics for spray foam insulation
Spray foam insulation outperforms traditional fiberglass batts primarily because it creates an airtight seal while providing superior thermal resistance. Unlike…
Cheap insulation solutions cost more over time through higher energy bills, frequent replacements, and potential property damage. In Wellington’s hot,…